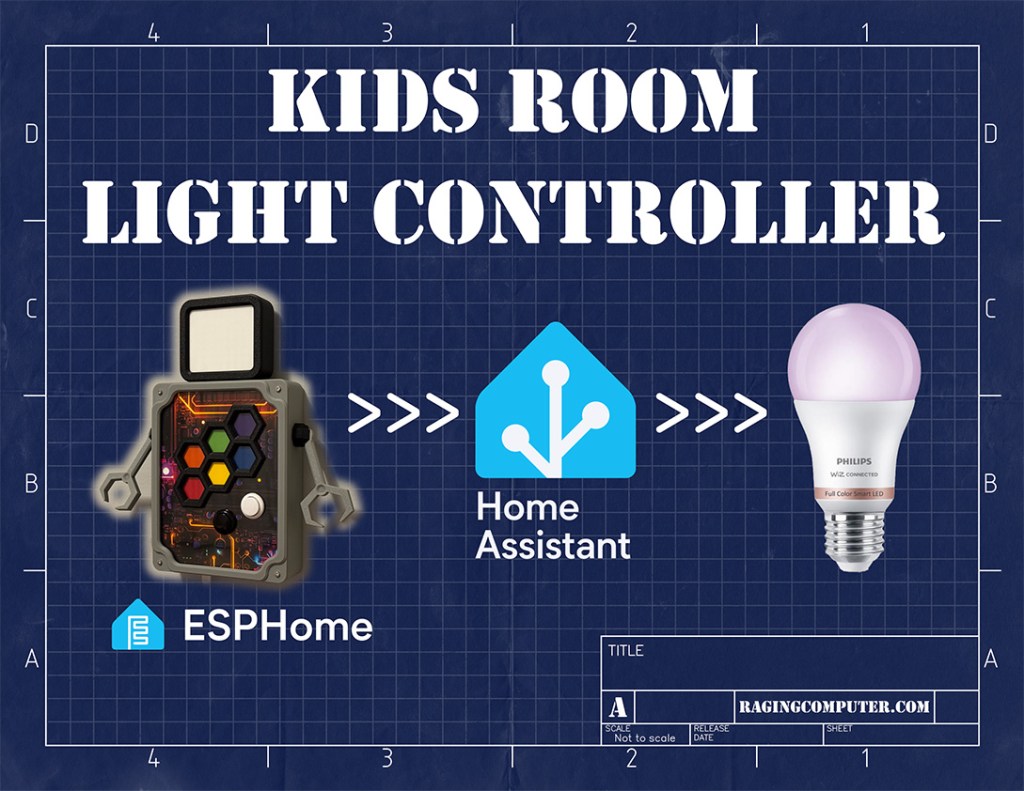
Or: How ESPHome and Home Assistant Made Me the Coolest Dad Ever
Smart homes can be pretty dumb. Automation is the goal but so often it devolves into fancy remote control. This is fine for adults with a smartphone but fails for children. This is my kids home too, so one goal is to make the house accessible for them. This is where purpose built remotes really shine. I’ve done this before for my daughter.
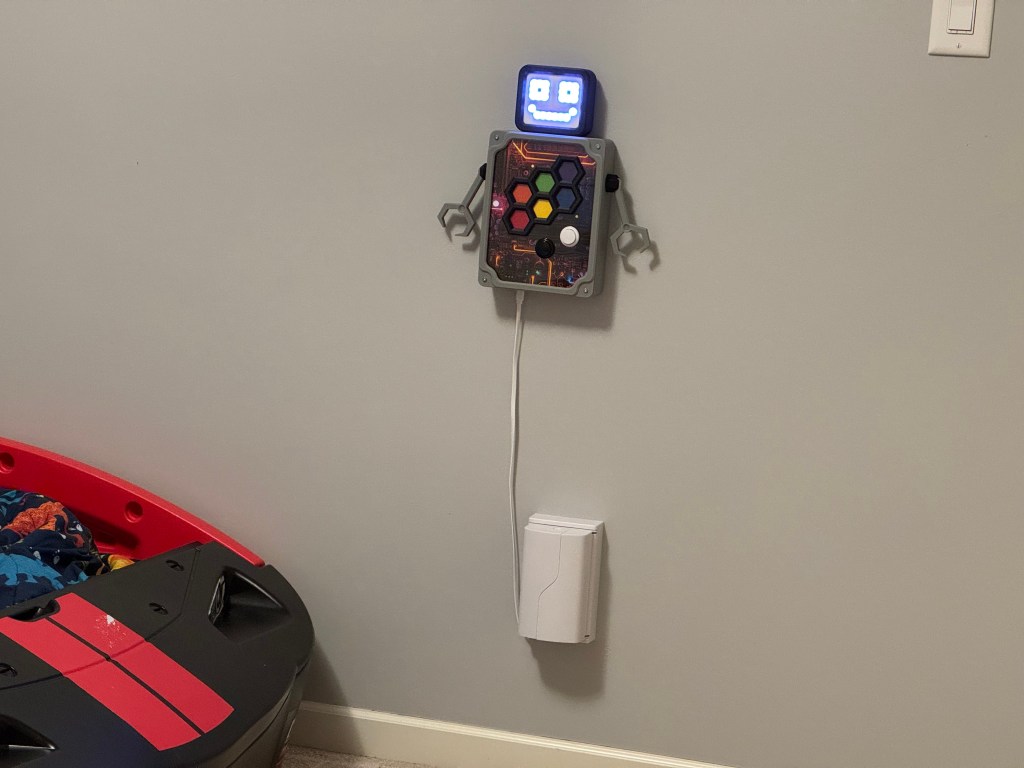
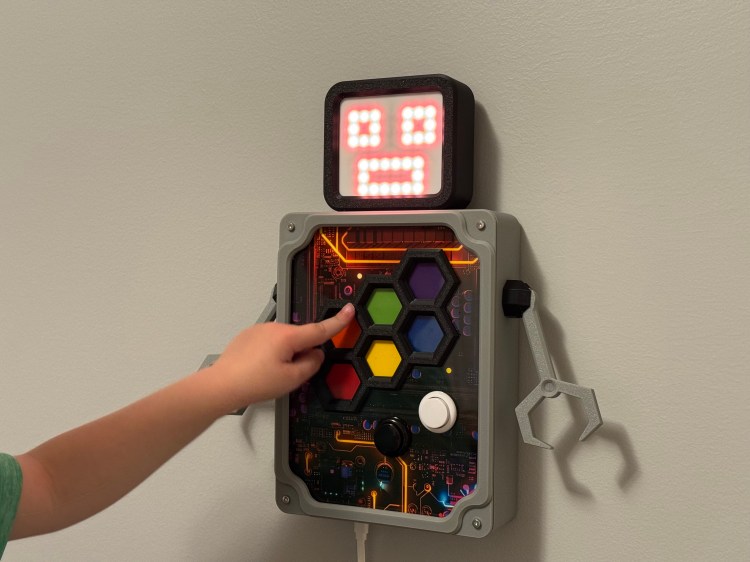
Now that my son is old enough to have preferences for his room, we’re starting to decorate it for his tastes. Color changeable lights can be fun for an accent or nightlight. He asked me for a robot, I think we can make that happen.
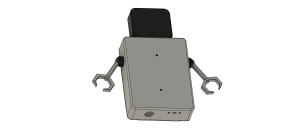
Finished Project:
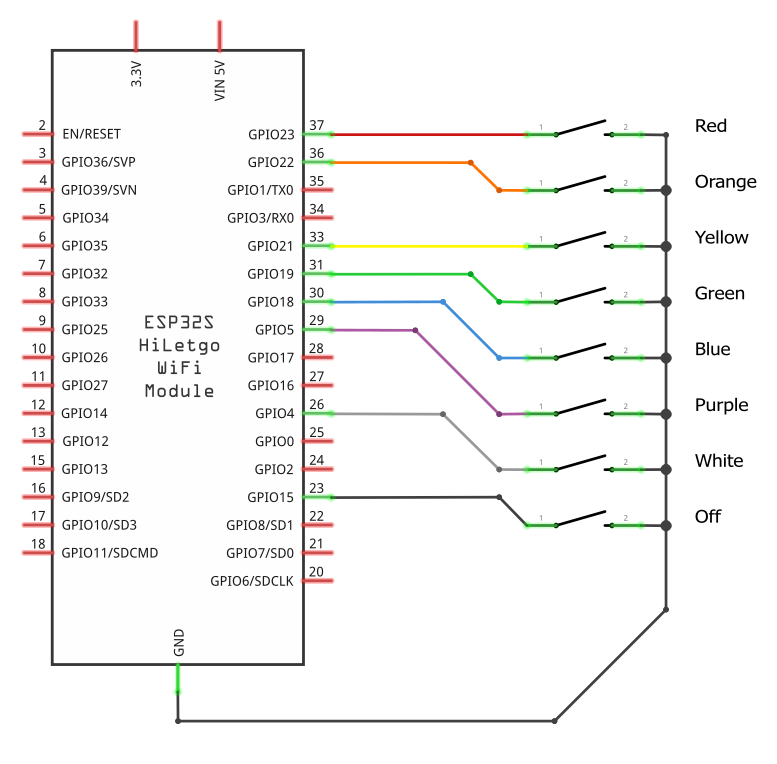
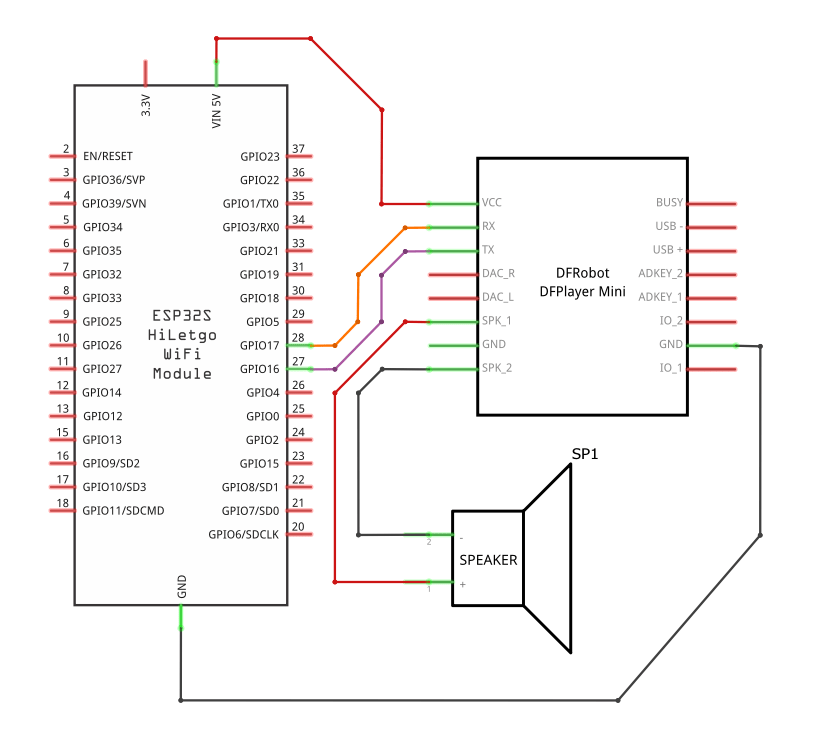
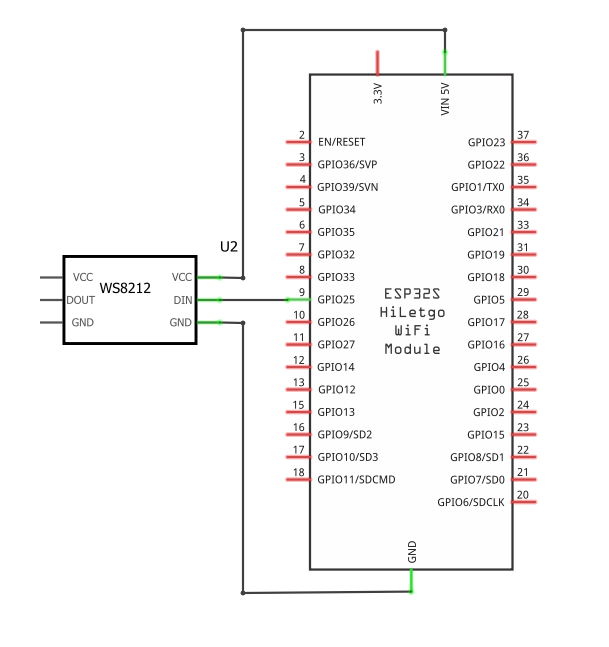
Electronics:
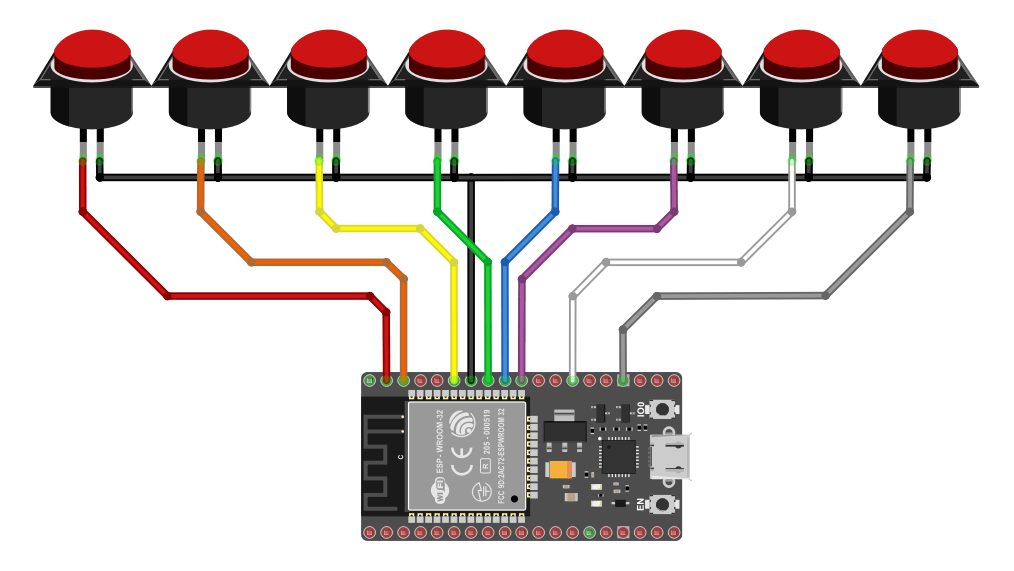
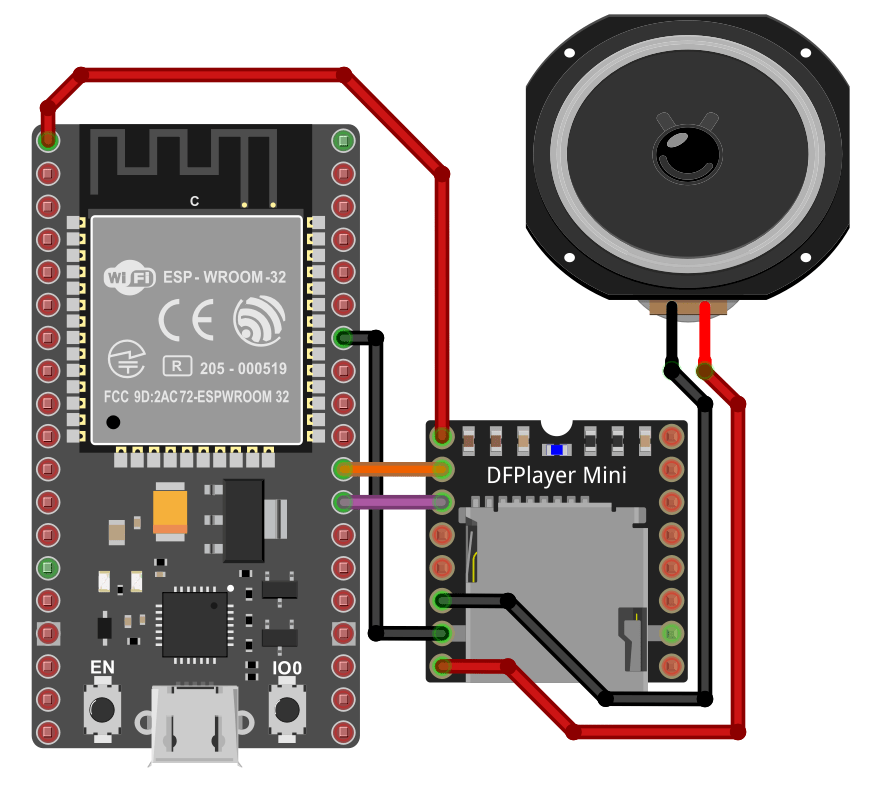
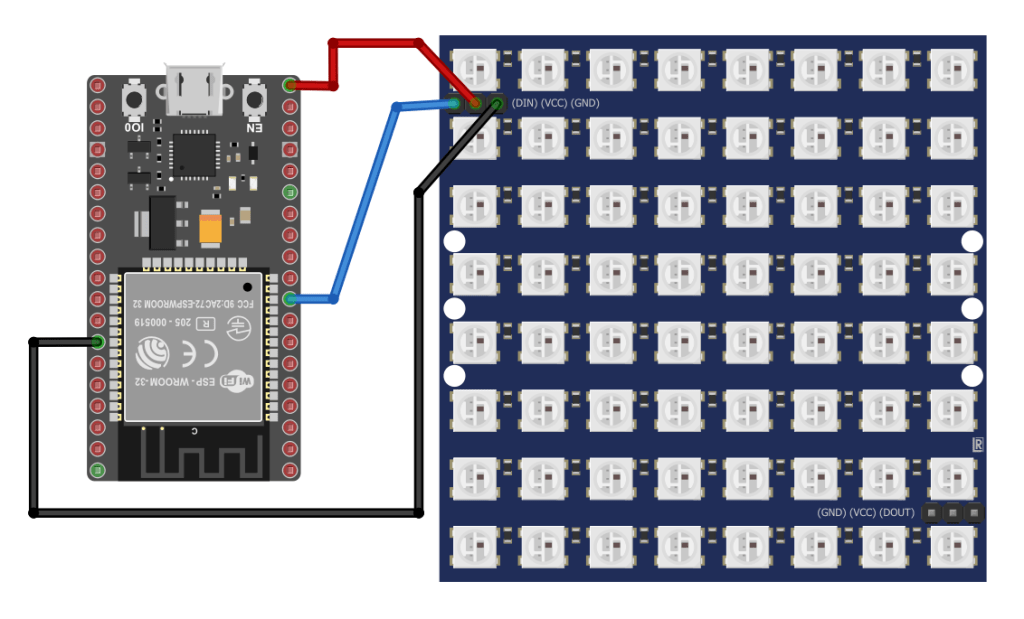
If you break the electronics up, it’s not as complicated. The buttons are all wired directly to a GPIO pin and GND using esp32’s input pullup. The DFPlayer Mini is wired to +3.3v, GND, and the pins for UART2. The WS2812 is wired to +5v, GND, and a GPIO pin.
Robot Build:
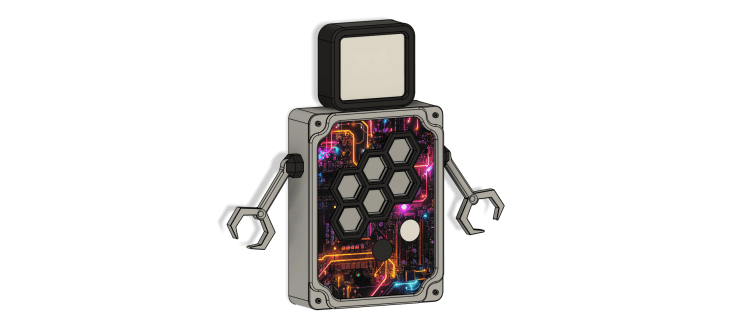
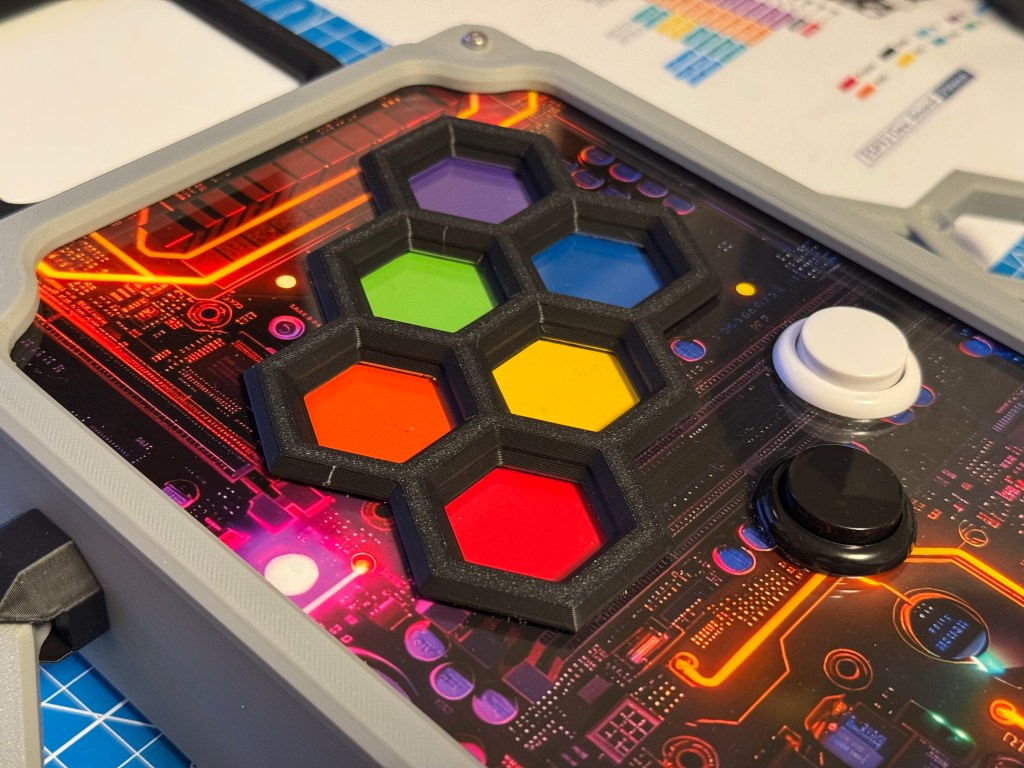
A box with generic pushbuttons and marker labels is just as effective… but my hobby is collecting tools and I need to justify having them. A full materials list is included at the end of this post.
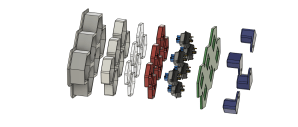
The hexagon buttons on the front use a mechanical keyboard switch. A 3d printed button sits on that. The colored vinyl is stuck to the button. A laser-cut clear acrylic window sits on that. Another 3d printed piece fits on that, and it’s all stuffed in the hexagon grid. Repeat for all switches. The switch back piece gets a center screw to hold it in together while you finish assembly.
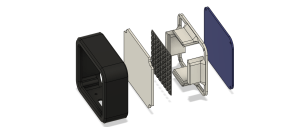
Start by attaching the head shell to the main body. The WS2812 8×8 neopixel matrix is sandwiched between a laser-cut white diffuser and a 3d printed standoff. This is all placed inside the head shell and head back plate is screwed on.
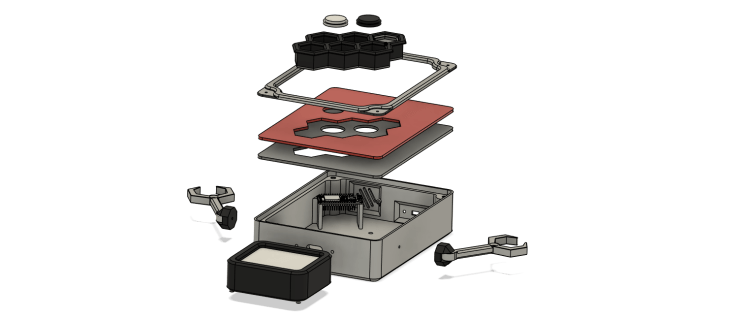
The arms are attached to the main body with a countersunk bolt into a captive nut on the inside of the main body.
The main body has an internal standoff for the ESP32 board, mounting posts for the speaker, panel holes for the USB micro extender. There are 2 laser-cut clear acrylic front panels. I printed and cut a design to sandwich between the acrylic panels. The hex buttons insert through the acrylic front panels, and are secured by 3d printed mounting brackets. The arcade buttons are just inserted from the front.
Once all of the electrical connections are completed, place the acrylic front panels into the recess in the main body. The front plate goes over the acrylic panels and screws secure it all in place.
Programming:
UX Requirements:
- Button press must trigger Home Assistant to change light color.
- Robot must be interactive; must provide visual feedback, confirm the color.
- Robot must only draw attention when interacting with it; must not interrupt sleep.
- Robot must have some personality.
My first attempt at building a light remote just exposed binary sensors to home assistant and triggered automations based off that. Since then I’ve discovered that homeassistant.event exists and keeps my entities list much tidier.
To provide visual feedback and confirm the color, the robot face is drawn in the color of the button that was just pressed. To be fun, it plays a random robot noise from the dfplayer mini and makes a couple different faces. It blinks with a 10% possibility every second while the face is shown.
To avoid drawing attention when it’s not in use, the robot face blanks 30 seconds after the last button press. It only makes noises when a button is pressed.
Giving an inanimate object some personality isn’t all that hard, all we need is a little license to use our imagination. A handful of face sprites and a bit of random delay can bring the robot to life.
Sounds are the other big part of giving the robot some personality. Get as many sound effects as you want, just name them with sequential numbers on the SD card and update the number of sounds in the rand_sound script. I found all of the sounds I used on the following sites.
owen-robot.yaml – ESPHome
esphome:
  name: owen-robot
  friendly_name: owen-robot

esp32:
  board: esp32dev
  framework:
    type: arduino

# Enable logging
logger:

# Enable Home Assistant API
api:
  encryption:
    key: !secret encryption_key

ota:
  - platform: esphome
    password: !secret ota_password

wifi:
  ssid: !secret wifi_ssid
  password: !secret wifi_password

  # Enable fallback hotspot (captive portal) in case wifi connection fails
  ap:
    ssid: "Owen-Robot"
    password: !secret fallback_password

web_server:
  port: 80

globals:
  - id: last_active
    # stores time of last interaction
    # used to turn off screen and manage button lockout
    type: int
    restore_value: no
    initial_value: '0'

  - id: last_color
    # stores color value associated with last button press
    # makes code less complicated than passing color variables
    type: Color
    restore_value: no
    initial_value: 'white'

  - id: screen_active
    # is screen supposed to be displaying an image?
    # used to keep random blink interval from turning on screen
    type: bool
    restore_value: no
    initial_value: 'false'

  - id: button_lockout
    # if true buttons should NOT respond to press
    # my kids push the buttons too quickly and Home Assistant
    # can't execute automations fast enough to keep up
    type: bool
    restore_value: no
    initial_value: 'false'

color:
  - id: red
    hex: 'FF0000'
  - id: orange
    hex: 'FFA500'
  - id: yellow
    hex: 'FFFF00'
  - id: green
    hex: '00FF00'
  - id: blue
    hex: '0000FF'
  - id: purple
    hex: '800080'
  - id: white
    hex: 'FFFFFF'
  - id: black
    hex: '000000'

dfplayer:

uart:
  # using pins for uart2 on esp32
  tx_pin: GPIO17
  rx_pin: GPIO16
  baud_rate: 9600

light:
  - platform: neopixelbus
    id: robot_face
    variant: WS2812
    pin: GPIO25
    num_leds: 64
    type: GRB
    # setting color correction to limit output brightness
    color_correct: [60%, 60%, 60%]
    # needs to be set to internal or will be exposed to home assistant
    internal: true

display:
  - platform: addressable_light
    id: led_matrix_display
    addressable_light_id: robot_face
    width: 8
    height: 8
    update_interval: 16ms

binary_sensor:
  - platform: gpio
    pin:
      number: GPIO23
      mode: INPUT_PULLUP
      inverted: True
    filters:
      # using filter to debounce
      delayed_on_off: 100ms
    name: "robotbutton-red"

    # needs to be set to internal or will be exposed to home assistant
    internal: true
    on_press:
      if:
        condition:
          # button will only respond if button_lock is false
          - not:
            - lambda: return id(button_lockout);
        then:
          # play beeps and boops
          - script.execute: rand_sound

          # stop any running isntance of draw_face
          # animations start to overlap without this
          - script.stop: draw_face

          # set color for robot face animations
          - globals.set:
              id: last_color
              value: red

          # send event to Home Assistant
          - homeassistant.event:
              event: esphome.robot_button_pressed
              data: {button: "red"}

          # draw the face
          - script.execute: draw_face

  - platform: gpio
    pin:
      number: GPIO22
      mode: INPUT_PULLUP
      inverted: True
    filters:
      delayed_on_off: 100ms
    name: "robotbutton-orange"
    internal: true
    on_press:
      if:
        condition:
          - not:
            - lambda: return id(button_lockout);
        then:
          - script.execute: rand_sound
          - script.stop: draw_face
          - globals.set:
              id: last_color
              value: orange
          - homeassistant.event:
              event: esphome.robot_button_pressed
              data: {button: "orange"}
          - script.execute: draw_face

  - platform: gpio
    pin:
      number: GPIO21
      mode: INPUT_PULLUP
      inverted: True
    filters:
      delayed_on_off: 100ms
    name: "robotbutton-yellow"
    internal: true
    on_press:
      if:
        condition:
          - not:
            - lambda: return id(button_lockout);
        then:
          - script.execute: rand_sound
          - script.stop: draw_face
          - globals.set:
              id: last_color
              value: yellow
          - homeassistant.event:
              event: esphome.robot_button_pressed
              data: {button: "yellow"}
          - script.execute: draw_face

  - platform: gpio
    pin:
      number: GPIO19
      mode: INPUT_PULLUP
      inverted: True
    filters:
      delayed_on_off: 100ms
    name: "robotbutton-green"
    internal: true
    on_press:
      if:
        condition:
          - not:
            - lambda: return id(button_lockout);
        then:
          - script.execute: rand_sound
          - script.stop: draw_face
          - globals.set:
              id: last_color
              value: green
          - homeassistant.event:
              event: esphome.robot_button_pressed
              data: {button: "green"}
          - script.execute: draw_face

  - platform: gpio
    pin:
      number: GPIO18
      mode: INPUT_PULLUP
      inverted: True
    filters:
      delayed_on_off: 100ms
    name: "robotbutton-blue"
    internal: true
    on_press:
      if:
        condition:
          - not:
            - lambda: return id(button_lockout);
        then:
          - script.execute: rand_sound
          - script.stop: draw_face
          - globals.set:
              id: last_color
              value: blue
          - homeassistant.event:
              event: esphome.robot_button_pressed
              data: {button: "blue"}
          - script.execute: draw_face

  - platform: gpio
    pin:
      number: GPIO05
      mode: INPUT_PULLUP
      inverted: True
    filters:
      delayed_on_off: 100ms
    name: "robotbutton-purple"
    internal: true
    on_press:
      if:
        condition:
          - not:
            - lambda: return id(button_lockout);
        then:
          - script.execute: rand_sound
          - script.stop: draw_face
          - globals.set:
              id: last_color
              value: purple
          - homeassistant.event:
              event: esphome.robot_button_pressed
              data: {button: "purple"}
          - script.execute: draw_face

  - platform: gpio
    pin:
      number: GPIO04
      mode: INPUT_PULLUP
      inverted: True
    filters:
      delayed_on_off: 100ms
    name: "robotbutton-white"
    internal: true
    on_press:
      if:
        condition:
          - not:
            - lambda: return id(button_lockout);
        then:
          - script.execute: rand_sound
          - script.stop: draw_face
          - globals.set:
              id: last_color
              value: white
          - homeassistant.event:
              event: esphome.robot_button_pressed
              data: {button: "white"}
          - script.execute: draw_face

  - platform: gpio
    pin:
      number: GPIO15
      mode: INPUT_PULLUP
      inverted: True
    filters:
      delayed_on_off: 100ms
    name: "robotbutton-off"
    internal: true
    on_press:
      if:
        condition:
          - not:
            - lambda: return id(button_lockout);
        then:
          - script.execute: rand_sound
          - script.stop: draw_face
          - globals.set:
              id: last_color
              value: black
          - script.execute: blank_screen
          - globals.set:
              id: screen_active
              value: 'false'
          - homeassistant.event:
              event: esphome.robot_button_pressed
              data: {button: "off"}


script:
  - id: rand_sound
    # the SD card in dfplayer only has robot beeps and boops
    # I don't have to care which one plays so pick one at random
    # dfplayer files are named with a number
    # there are 11 files. add 1 because random starts at 0, dfplayer files start at 1
    then:
      - dfplayer.play:
          file: !lambda 'return (random_uint32() % 11) + 1;'
          loop: false

  - id: reset_idle_timer
    # sets screen_active to true and updates the last_active with current time
    # used to turn off screen and manage button lockout
    then:
      - globals.set:
          id: screen_active
          value: 'true'
      - lambda: |-
          id(last_active) = millis() / 1000;

  - id: blank_screen
    # fills the screen with black pixels
    then:
      - lambda: |-
              Color off = Color(0x000000);
              id(led_matrix_display).filled_rectangle(0, 0, 8, 8, off);

  - id: draw_face
    # update the last_active variable
    # set button_lockout
    # draws face sprites in rapid succession to creation animation
    # includes a blink so the face blinks at least once
    then:
      - script.execute: reset_idle_timer
      - globals.set:
          id: button_lockout
          value: 'true'
      - script.execute: blank_screen
      - script.execute: draw_smile_face
      - delay: 250ms
      - script.execute: blank_screen
      - script.execute: draw_wow_face
      - delay: 300ms
      - script.execute: blank_screen
      - script.execute: draw_smile_face
      - delay: 250ms
      - script.execute: blank_screen
      - script.execute: draw_wow_face
      - delay: 500ms
      - script.execute: blank_screen
      - script.execute: draw_smile_face
      - delay: 500ms
      - delay: !lambda 'return (random_uint32() % 5000) + 1;'
      - script.execute: blank_screen
      - script.execute: draw_blink_face
      - delay: 400ms
      - script.execute: blank_screen
      - script.execute: draw_smile_face


  - id: draw_smile_face
    # draw smile face using last color
    #  |        |
    #  |###  ###|
    #  |# #  # #|
    #  |###  ###|
    #  |        |
    #  |#      #|
    #  | ###### |
    #  |        |
    then:
      - lambda: |-
              Color face_color = id(last_color);
              id(led_matrix_display).rectangle(0, 1, 3, 3, face_color);
              id(led_matrix_display).rectangle(5, 1, 3, 3, face_color);
              id(led_matrix_display).line(0, 5, 1, 6, face_color);
              id(led_matrix_display).line(7, 5, 6, 6, face_color);
              id(led_matrix_display).line(1, 6, 6, 6, face_color);


  - id: draw_blink_face
    # draw blink face using last color
    #  |        |
    #  |        |
    #  |###  ###|
    #  |        |
    #  |        |
    #  |#      #|
    #  | ###### |
    #  |        |
    then:
      - lambda: |-
              Color face_color = id(last_color);
              id(led_matrix_display).line(0, 2, 2, 2, face_color);
              id(led_matrix_display).line(5, 2, 7, 2, face_color);
              id(led_matrix_display).line(0, 5, 1, 6, face_color);
              id(led_matrix_display).line(7, 5, 6, 6, face_color);
              id(led_matrix_display).line(1, 6, 6, 6, face_color);


  - id: draw_wink_face
    # draw wink face using last color
    #  |        |
    #  |###     |
    #  |# #  ###|
    #  |###     |
    #  |        |
    #  |#      #|
    #  | ###### |
    #  |        |
    then:
      - lambda: |-
              Color face_color = id(last_color);
              id(led_matrix_display).rectangle(0, 1, 3, 3, face_color);
              id(led_matrix_display).line(5, 2, 7, 2, face_color);
              id(led_matrix_display).line(0, 5, 1, 6, face_color);
              id(led_matrix_display).line(7, 5, 6, 6, face_color);
              id(led_matrix_display).line(1, 6, 6, 6, face_color);


  - id: draw_wow_face
    # draw wow face using last color
    #  |        |
    #  |###  ###|
    #  |# #  # #|
    #  |###  ###|
    #  |        |
    #  | ###### |
    #  | #    # |
    #  | ###### |
    then:
      - lambda: |-
              Color face_color = id(last_color);
              id(led_matrix_display).rectangle(0, 1, 3, 3, face_color);
              id(led_matrix_display).rectangle(5, 1, 3, 3, face_color);
              id(led_matrix_display).rectangle(1, 5, 6, 3, face_color);


  - id: draw_neutral_face
    # draw neutral face using last color
    #  |        |
    #  |###  ###|
    #  |# #  # #|
    #  |###  ###|
    #  |        |
    #  |        |
    #  | ###### |
    #  |        |
    then:
      - lambda: |-
              Color face_color = id(last_color);
              id(led_matrix_display).rectangle(0, 1, 3, 3, face_color);
              id(led_matrix_display).rectangle(5, 1, 3, 3, face_color);
              id(led_matrix_display).line(1, 6, 6, 6, face_color);


  - id: draw_sad_face
    # draw sad face using last color
    #  |        |
    #  |###  ###|
    #  |# #  # #|
    #  |###  ###|
    #  |        |
    #  |        |
    #  | ###### |
    #  |#      #|
    then:
      - lambda: |-
              Color face_color = id(last_color);
              id(led_matrix_display).rectangle(0, 1, 3, 3, face_color);
              id(led_matrix_display).rectangle(5, 1, 3, 3, face_color);
              id(led_matrix_display).line(1, 7, 2, 6, face_color);
              id(led_matrix_display).line(6, 7, 5, 6, face_color);
              id(led_matrix_display).line(2, 6, 5, 6, face_color);


  - id: draw_ghost
    # draw ghost using last color
    #  | ###### |
    #  |########|
    #  |#  ##  #|
    #  |#  ##  #|
    #  |########|
    #  |########|
    #  |########|
    #  |## ## ##|
    then:
      - lambda: |-
              Color ghost_color = id(last_color);
              id(led_matrix_display).line(1, 0, 6, 0, ghost_color);
              id(led_matrix_display).line(1, 1, 7, 1, ghost_color);
              id(led_matrix_display).line(0, 2, 0, 3, ghost_color);
              id(led_matrix_display).filled_rectangle(3, 2, 2, 2, ghost_color);
              id(led_matrix_display).line(7, 2, 7, 3, ghost_color);
              id(led_matrix_display).filled_rectangle(0, 4, 8, 3, ghost_color);
              id(led_matrix_display).line(0, 7, 1, 7, ghost_color);
              id(led_matrix_display).line(3, 7, 4, 7, ghost_color);
              id(led_matrix_display).line(6, 7, 7, 7, ghost_color);


  - id: draw_skull
    # draw skull using last color
    #  | ###### |
    #  |########|
    #  |#  ##  #|
    #  |#  ##  #|
    #  |########|
    #  |  ####  |
    #  |  ####  |
    #  |  ####  |
    then:
      - lambda: |-
              Color skull_color = id(last_color);
              id(led_matrix_display).line(1, 0, 6, 0, skull_color);
              id(led_matrix_display).line(1, 1, 7, 1, skull_color);
              id(led_matrix_display).line(0, 2, 0, 3, skull_color);
              id(led_matrix_display).filled_rectangle(3, 2, 2, 2, skull_color);
              id(led_matrix_display).line(0, 4, 7, 4, skull_color);
              id(led_matrix_display).filled_rectangle(2, 5, 4, 3, skull_color);


  - id: draw_star
    # draw star using last color
    #  |   ##   |
    #  |   ##   |
    #  |  ####  |
    #  |########|
    #  | ###### |
    #  |  #  #  |
    #  | ##  ## |
    #  | #    # |
    then:
      - lambda: |-
              Color star_color = id(last_color);
              id(led_matrix_display).line(3, 0, 4, 0, star_color);
              id(led_matrix_display).line(3, 1, 4, 1, star_color);
              id(led_matrix_display).line(2, 2, 5, 2, star_color);
              id(led_matrix_display).line(0, 3, 7, 3, star_color);
              id(led_matrix_display).line(1, 4, 6, 4, star_color);


  - id: draw_heart_big
    # draw heart big using last color
    #  | ##  ## |
    #  |########|
    #  |########|
    #  |########|
    #  |########|
    #  | ###### |
    #  |  ####  |
    #  |   ##   |
    then:
      - lambda: |-
              Color heart_color = id(last_color);
              id(led_matrix_display).line(1, 0, 2, 0, heart_color);
              id(led_matrix_display).line(5, 0, 6, 0, heart_color);
              id(led_matrix_display).filled_rectangle(0, 1, 8, 4, heart_color);
              id(led_matrix_display).line(1, 5, 6, 5, heart_color);
              id(led_matrix_display).line(2, 6, 5, 6, heart_color);
              id(led_matrix_display).line(3, 7, 4, 7, heart_color);


  - id: draw_heart_small
    # draw heart big using last color
    #  |        |
    #  |  #  #  |
    #  | ###### |
    #  | ###### |
    #  | ###### |
    #  |  ####  |
    #  |   ##   |
    #  |        |
    then:
      - lambda: |-
              Color heart_color = id(last_color);
              id(led_matrix_display).draw_pixel_at(2, 1, heart_color);
              id(led_matrix_display).draw_pixel_at(5, 1, heart_color);
              id(led_matrix_display).filled_rectangle(1, 2, 6, 3, heart_color);
              id(led_matrix_display).line(2, 5, 5, 5, heart_color);
              id(led_matrix_display).line(3, 6, 4, 6, heart_color);


interval:
  - interval: 1s
    then:
      - if:
          # If it has been more than 30 seconds since last interaction
          # blank the screen and set screen_active to false
          condition:
            lambda: return (millis() / 1000) - id(last_active) >= 30;
          then:
            - script.execute: blank_screen
            - globals.set:
                id: screen_active
                value: 'false'
      - if:
          # random blink
          # plays blink animation if the following conditions are met
          #   - screen_active is true
          #   - draw_face is NOT running
          #   - a random 10% chance
          condition:
            and:
              - lambda: return (random_uint32() % 100) <= 10;
              - lambda: return id(screen_active);
              - not:
                - script.is_running: draw_face
          then:
            - script.execute: blank_screen
            - script.execute: draw_blink_face
            - delay: 400ms
            - script.execute: blank_screen
            - script.execute: draw_smile_face
      - if:
          # If it has been more than 2 seconds since last interaction
          # set button_lockout to false to allow buttons to function again
          condition:
            lambda: return (millis() / 1000) - id(last_active) >= 2;
          then:
            - globals.set:
                id: button_lockout
                value: 'false'
RobotButton Example – Home Assistant Automation
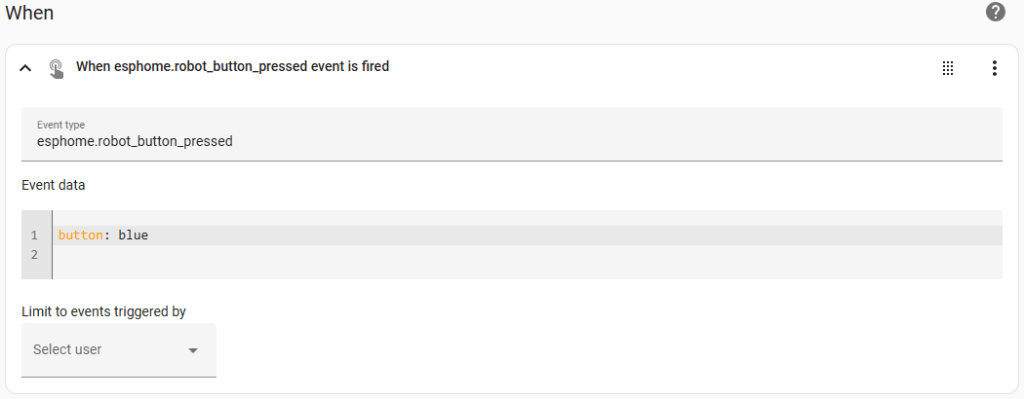
The Home Assistant side of this is simple. Add the esphome device and lights to control. Once that’s set up, I have one automation that fires for each button. The trickiest part was getting the event and event data mapped correctly. In my case, I’m using esphome.robot_button_pressed and button: blue to identify which button was pressed.
Note: The action doesn’t have to be turning on a light and setting a color. It could be activating a scene, turn on/off fan, open/close blinds, start/stop a media player, or anything else you can imagine.
alias: RobotButton Blue
description: ""
triggers:
  - event_type: esphome.robot_button_pressed
    trigger: event
    event_data:
      button: blue
conditions: []
actions:
  - data:
      brightness_pct: 15
      rgb_color:
        - 0
        - 0
        - 255
    target:
      entity_id:
        - light.owen_lamp
    action: light.turn_on
mode: single
Materials Used:
Electronics:
- ESP-32S Development Board 2 Pack
- DFPlayer Mini MP3 Player Module
- 3W 8Ω Mini Speaker
- WS2812 LED 5050 RGB 8×8 LED Matrix
- Arcade Push Button, 24MM with 2.8MM Terminals
- Female Spade Crimp Terminals 2.8mm Non Insulated Pack of 100
- IWISS SN-28B Crimping Tool for AWG28-18 Dupont Pins
- Micro USB Extension Cable
- Philips Color and Tunable White LED Wi-Fi Wiz Connected
Custom Hexagon Buttons:
- Mechanical Keyboard Switch Dust-Proof Blue 3Pin Compatible with MX Switch
- Rainbow Pack 12″x12″ Permanent/Outdoor (Glossy) Adhesive Vinyl for Craft Cutters
Robot Case:
- ELEGOO PLA Plus Filament 1.75mm Gray
- ELEGOO PLA Plus Filament 1.75mm Black
- 3mm (1/8″) Translucent (“Opaque”) White Acrylic
- 3mm (1/8″) Transparent Clear Acrylic
- M2.5 Stainless Steel Socket Head Cap Screw Assortment Kit
- Ultra Thin Hex Socket Head Metric Screw Assortment Kit
- Countersunk Hex Socket Head Metric Screw Assortment Kit
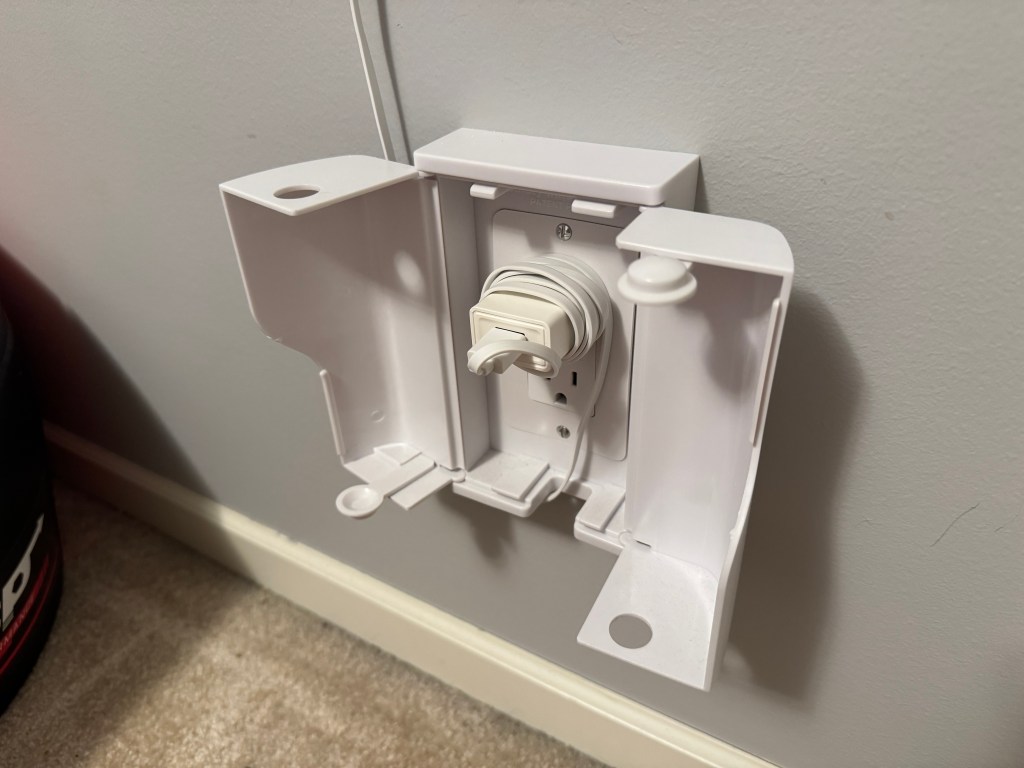
- In-Use Outlet Cover Box for Babyproofing Outlets
As an Amazon Associate I earn from qualifying purchases.
